Creating Presence Reason Lists
Presence reason lists let you group and manage individual presence reasons. You can, for example, group individual, related presence reasons that agents regularly use.

|
To view presence reason lists in any CxEngage product, your role requires the READ_REASON_LIST permission. To create presence reason lists in CxEngage, your role requires the CREATE_REASON_LIST permission, which inherits READ_REASONS_LIST. |
To create a presence reason list:
- If you haven't already done so, create the presence reason codes that your organization uses.
- Select User Management > Presence Reason Lists.
- Click Create.
- Enter a Name for the list.
- Optionally, enter:
- An External ID, which identifies the list in an third-party system.
- A short Description of the list.
- If you want this list to be available to one or more sub tenants, click Shared.
Once you enable this setting, you can't disable it in the CxEngage Configuration Console. - If this list should be assigned to everyone by default, click to enableTenant Default.
- In the Reasons section of the side panel, click the Add Presence Reason icon (
 ).
). - Click the down arrow and select a presence reason from the list that displays.
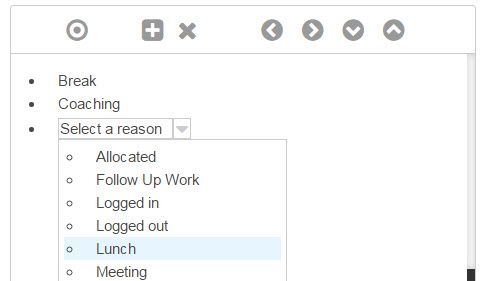
- Repeat steps 8 and 9 for each presence reason you want to add to the list.
- When you've finished adding presence reasons to the list, click Submit.
Nesting Reason Codes in a List
You can nest similar reason codes within a list by creating categories. Categories are headings under which you add reasons. For example, if you have reasons named Meeting and Training, you can nest them under a category named Away Reasons.
To nest reason codes in a list:
- Click the Add Category icon (
 ).
). - Type a name for the category – for example, Away Reasons.
- Do one of the following:
- If you already have reasons in the list, use the
 icon to move it below the category. Then, click
  to nest the reason under the category.
 - Add reasons to the list, then click to nest those reasons under the category.
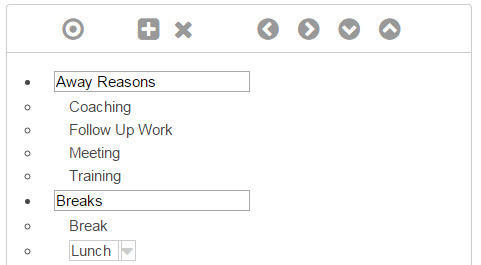
- If you already have reasons in the list, use the
- Click Submit.
